Saturday, September 1, 2012

September Special

Golly Gee!  Is it September already?

I'm starting to run a monthly special on Facebook ("like" my page HERE) and through my ETSY SHOP.

I'm starting to gear up for the fall season and for Halloween!!  It is one of my favorite times of the year. I'm running a Halloween hairbow special this month and next month I'll be doing Halloween shirts!  I can't wait to get them going.


For this month only, you can get all three of these hand-embroidered felt hair barrettes for only $8.  Contact me via facebook and I will set up payment and ship them out!  You will have plenty of time to build your girl's spooky halloween wardrobe around these cute little guys.


Thursday, March 15, 2012

Sock Monkey Favors--Baby Food Jar Cupcakes

One thing a craft hoarding mother of a one year old has plenty of is baby food jars.  Unless you make your own...then kudos to you!  I made FAVORS for Lotte's First Birthday using baby food jars with jelly bellies.  So going with the same idea I wanted to do take away cupcakes in a jar.


I really just loved how Brother's party favors turned out!  I used THIS recipe for Cherry Vanilla Dr. Pepper Cupcakes with Vanilla and Cherry Buttercream Frosting.  I made mini cupcakes (without liners) and used 2 in each jar along with 3 layers of frosting.  


The baby food jars were washed and sanitized.  I very carefully mod-podged matching houndstooth patterned paper on to the top of the lid.  Then I hot glued on pom pom trim around the edge...it came in the perfect size.  


The spoons were probably my favorite part.  I purchased these from Lemon Drop Shop.  They were only $2.50 for 50 wooden spoons!!


I stamped "THANKS" on to the handle of each spoon using a lovely aqua colored ink.  Mini Color Boxes are my favorites because they are less expensive and come in so many colors.


I attached the spoons to the baby food jars using Caribbean blue twine from The Twinery.


They were delicious, a big hit with guests, and inexpensive.  I spent $2.50 on the spoons and about $6.00 on the trim from Walmart.  I made 40 baby food jar cupcakes...and I only had about 8 left over.

Linking up here! Thanks Ladies!!

Monday, March 5, 2012

Little Brother's Birthday Attire

**So apparently something has happened to last week's full birthday party post...I'm trying to fix it/redo it, so until then enjoy outfits!**

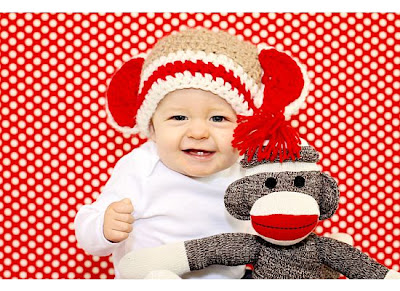
If you are having a sock monkey birthday party, you must have a sock monkey hat!  There are so many crocheted hats on etsy.  I was really close to buying one, and then I found this FREE pattern from Red Heart.  This is the first hat like this type that I have crocheted.  It was a perfect fit!


If you have read my blog much, you know that I like to make shirts...Circus Party ShirtMustache ShirtsWatermelon Party ShirtSt. Patrick's Day Shirt, and my all time favorite Lotte's Ruffle Chickie Shirt...

So here is Brother's birthday shirt.


I love the bunting because we used a lot of them throughout the party decorations.

He is actually blowing kisses here...not saying "Oh.Come.On."

For his cake smash, I didn't want just his birthday suit (HAHA) so I made him cute little man suspenders in decor-matching fabric.  If you didn't see it last week, you can see the tutorial HERE.  And here is a little tip for you...the white diaper cover is actually "bloomers" from one of sisters spring dresses from when she was little.  reduce REUSE recycle.


He got rather messy with his little cake.  I love the "blue beard" look!  It isn't a first birthday if Mommy and Daddy don't have icing all over their faces too!

Thursday, March 1, 2012

Mister's Sock Monkey Party

Here is a photobomb of Brother's 1st Birthday.

I have various posts with more details scheduled for later!


Tuesday, February 28, 2012

Little Boy Suspenders


There are a few tutorials on the web that are for little man suspenders.

HERE is one that uses "Fashion Fit" clips that I couldn't find in my local stores.

HERE is another tutorial that uses dyed elastic, but that was a little too expensive for me.

I like the first tutorial, but I couldn't find affordable clips and mine needed to be all fabric.  I grabbed some houndstooth that matches Brother's party stuff, a pair of thrifted suspenders and got to work.

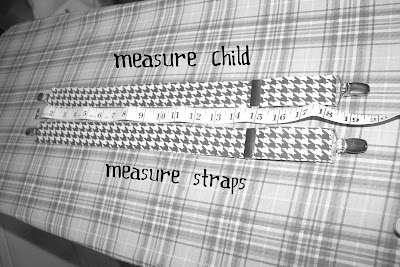
(forgive the black and white pictures, but you really don't want to see my ironing board cover...blech)

For Brother (one year old) I made my fabric strips 24 inches long.  For a toddler, I would go with 27; infant 21...if in doubt, measure baby and add 4-5 inches.  Your width will depend on how wide your suspender clips are.  My clip was a little less than and inch and a half.

Sew Right Sides Together to form a long tube.  Turn tube of fabric right side out.

Press so the hem is in the middle...this will be the back of your suspender.
I used a thrifted pair of suspenders and cut the metal attachments off of the elastic.
Here is where it gets a bit complicated, and I hope that my pictures can explain it better.  If not, take pictures of your intact suspenders to use as reference for how they go back together.

The part that lengthens the suspender is call the "SLIDE".  (I didn't make that up)  You will use a roll hem and sew the FRONT of the FABRIC with the BACK side of the SLIDE facing you.

Pull the suspender "CLIP" onto the strip of fabric with the clip facing the right side of fabric.

Pull the free end of the fabric through the slide.  Now it looks like suspenders!

The second clip goes on the open end of the fabric.  Sew it on just as you did the slide.  Using a roll hem so you don't see the ratty end of the fabric.

REPEAT, because you need two straps silly!

Measure your child from front waist band to the back waist band, making sure you cross it in the back.
After you have that measurement, make sure both of your straps are even.

I tried them on Brother and found where they crossed well in the back.  You could guess, but make sure the back clips are several inches apart, or they won't lay flat.

Sew a diamond shape where the straps overlap.  You don't have to do a diamond either...the next time I'm thinking of doing straight lines all the way across or just doing a big "X".  I will also be using iron on interfacing for the next pair.  These worked great for what I was wanting, but I think they would be better with a little more umph!


The suspenders where a HUGE hit for Brother's Birthday Pictures and Party!  Everyone loved them and couldn't believe that I made them myself.  I really love that they match his birthday party colors perfectly.  But you will have to wait to see all that until after the GRAND PARTY reveal!

Linking up to these lovely and gracious hostesses!

We Did It Wednesday--Sew Much Ado
Inspiring Creativity--Dragonfly Designs
Show and Tell--Blue Cricket Design
DIY Under $5--A Little Tipsy
Get Your Brag On--Gluesticks
A fun new to me link party Trendy Tots--A Real Life Housewife
What Are Little Boys Made Of--733blog
Sundae Scoop--I Heart Naptime
Saturday Seven Party--Positively Splendid
Get Your Craft On--Today's Creative Blog
Craft and Tell--Cherished Bliss

Thursday, February 23, 2012

Birthday Art


I have seen some of the word art using birthday party pictures around on pinterest and thought I would try my hand at it on picnik.  I'm in love and now I'm making one for Lotte's birthday pictures too.

This picture and all of Brother's Birthday Pictures were taken by the awesomely talented Steph's Photography.

FYI:  If you live under a rock, Picnik is shutting down.  So all the premium features are free.  Get some collages done while it's still open!

Tuesday, February 14, 2012

Brother's 1 Year Photo Shoot

*Don't tell anyone that he is only just barely 11 months, we had to fit it in sometime*

We went to an awesome photographer Stephanie of Steph's Photography for Brother's 1 year pictures.  I really wish that I would have known about her sooner so she could have been taking pictures of Lotte too.  She has a little studio out in her garage and a fabulous array of photo props!

My little man was such a ham and he was in a PERFECT mood.  I will always cherish this night and these pictures of my "almost" 1 year old.


Related Posts Plugin for WordPress, Blogger...