There are a few tutorials on the web that are for little man suspenders.
HERE is one that uses "Fashion Fit" clips that I couldn't find in my local stores.
HERE is another tutorial that uses dyed elastic, but that was a little too expensive for me.
I like the first tutorial, but I couldn't find affordable clips and mine needed to be all fabric. I grabbed some houndstooth that matches Brother's party stuff, a pair of thrifted suspenders and got to work.
(forgive the black and white pictures, but you really don't want to see my ironing board cover...blech)
For Brother (one year old) I made my fabric strips 24 inches long. For a toddler, I would go with 27; infant 21...if in doubt, measure baby and add 4-5 inches. Your width will depend on how wide your suspender clips are. My clip was a little less than and inch and a half.
Sew Right Sides Together to form a long tube. Turn tube of fabric right side out.
Press so the hem is in the middle...this will be the back of your suspender.
I used a thrifted pair of suspenders and cut the metal attachments off of the elastic.
Here is where it gets a bit complicated, and I hope that my pictures can explain it better. If not, take pictures of your intact suspenders to use as reference for how they go back together.
The part that lengthens the suspender is call the "SLIDE". (I didn't make that up) You will use a roll hem and sew the FRONT of the FABRIC with the BACK side of the SLIDE facing you.
Pull the suspender "CLIP" onto the strip of fabric with the clip facing the right side of fabric.
Pull the free end of the fabric through the slide. Now it looks like suspenders!
The second clip goes on the open end of the fabric. Sew it on just as you did the slide. Using a roll hem so you don't see the ratty end of the fabric.
REPEAT, because you need two straps silly!
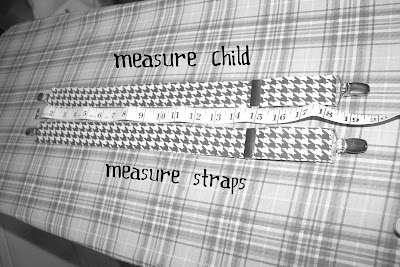
Measure your child from front waist band to the back waist band, making sure you cross it in the back.
After you have that measurement, make sure both of your straps are even.
I tried them on Brother and found where they crossed well in the back. You could guess, but make sure the back clips are several inches apart, or they won't lay flat.
Sew a diamond shape where the straps overlap. You don't have to do a diamond either...the next time I'm thinking of doing straight lines all the way across or just doing a big "X". I will also be using iron on interfacing for the next pair. These worked great for what I was wanting, but I think they would be better with a little more umph!
The suspenders where a HUGE hit for Brother's Birthday Pictures and Party! Everyone loved them and couldn't believe that I made them myself. I really love that they match his birthday party colors perfectly. But you will have to wait to see all that until after the GRAND PARTY reveal!
Linking up to these lovely and gracious hostesses!
We Did It Wednesday--Sew Much Ado
Inspiring Creativity--Dragonfly Designs
Show and Tell--Blue Cricket Design
DIY Under $5--A Little Tipsy
Get Your Brag On--Gluesticks
A fun new to me link party Trendy Tots--A Real Life Housewife
What Are Little Boys Made Of--733blog
Sundae Scoop--I Heart Naptime
Saturday Seven Party--Positively Splendid
Get Your Craft On--Today's Creative Blog
Craft and Tell--Cherished Bliss


How cute are those! Would love for you to link up to Trendy Tots at http://areal-lifehousewife.blogspot.com/2012/02/what-she-wore-wednesday-and-trendy-tots_29.html
ReplyDeleteFound you via We Did it Wednesday!
SUPER cute!!! Great photos too ~ thanks for linking up! Featured on FB :)
ReplyDeletexo
Heather
Adorable! So cute for a birthday party too. Love the photos with the bunting.
ReplyDeleteThese are so cute! I have two little boys so I have to try these! I would love for you to share this at my link party!
ReplyDeletehttp://thewinthropchronicles.blogspot.com/2012/03/share-it-link-party-1.html
Great blog. Following you now.
ReplyDeleteThanks for the great information. I am using quilting weight cotton, do you think lightweight interfacing is necessary?
ReplyDeleteOops just caught the part about using interfacing next time :P
ReplyDeleteWhere did you find the slides? I've checked all the big craft stores, and even Walmart. I found clips okay. I ended up using elastic that I covered in the same fabric. I only wanted one clip on the back, since I had to make 3 pair, and wanted to keep cost down!
ReplyDeleteThere is no competition for your content with anyone. In my opinion, it is one of the most impressive and informative articles. Thanks for sharing this post.
ReplyDeleteSecure Eraser
Smothvideo Project
AnyTrans License Key