Showing posts with label Mommy Magic. Show all posts

Monday, January 30, 2012

Valentine's Day Wreath

Here is my front door decor for the month.


It was so easy to make, I want to do one for every holiday/month!  Husband might disagree, but our door MUST be festive all year round!


I'm linking up to these awesome ladies!

Tuesday, June 14, 2011

A Wedding Shower Gift


I made this cutie a while ago for a sweet little girl who is getting married in August!  She is like a little sister and I wanted to make her something special.  

It is made out of crepe paper rosettes!  A LOT of crepe paper rosettes.  I almost didn't get it finished before it was time to go to the shower.  I only had a minute to snap a few shots of the wreath. 

And after taking the picture I realized I was missing a little "flag" on the bunting.  So the finished product has an extra green flag on the left.

I can't wait for her wedding!  I'm so happy that she has found someone that makes her "complete"!

Monday, June 6, 2011

Headband holder

A while ago,  Courtier Mommy posted my headband holder tutorial.  Since then she has had her TWINS!  {What did you do last week! Ha} Now I'm going to share the tutorial on my blog!  Here is part of the post from her blog.......

Lately Lotte and I have been wearing a lot of headbands with fabric and ribbon rosettes.  We have a LOT!  Have you noticed that headbands are extremely difficult to store.  I found myself putting them all in a gallon sized ziplock bag and shoving them into the bathroom closet.  ~not cool~ But a headbands don't clip, so I had to make a ribbon holder with loops


........and here is how I did it.


You will need:
34 inches of wide (1 1/2 inch) ribbon
54 inches of narrower (7/8 inch) ribbon {I left mine on the spool to make sure that I had enough}
3 inches of narrow (3/4 inch) ribbon
Straight Pins
Sewing Gauge
Sewing machine and tools

{all measurements are for my 33 1/2 inch long holder with 10 loops that are the perfect size for skinny headbands.  You could just as easily make yours with more loops, less loops or even bigger loops for bigger headbands}

Start out with your wide ribbon and heat seal the ends by running them near a candle flame.
Place your narrower ribbon centered on the wide ribbon and pin them together near the top edge.
Measure 3 inches from top and add a pin to mark your place.

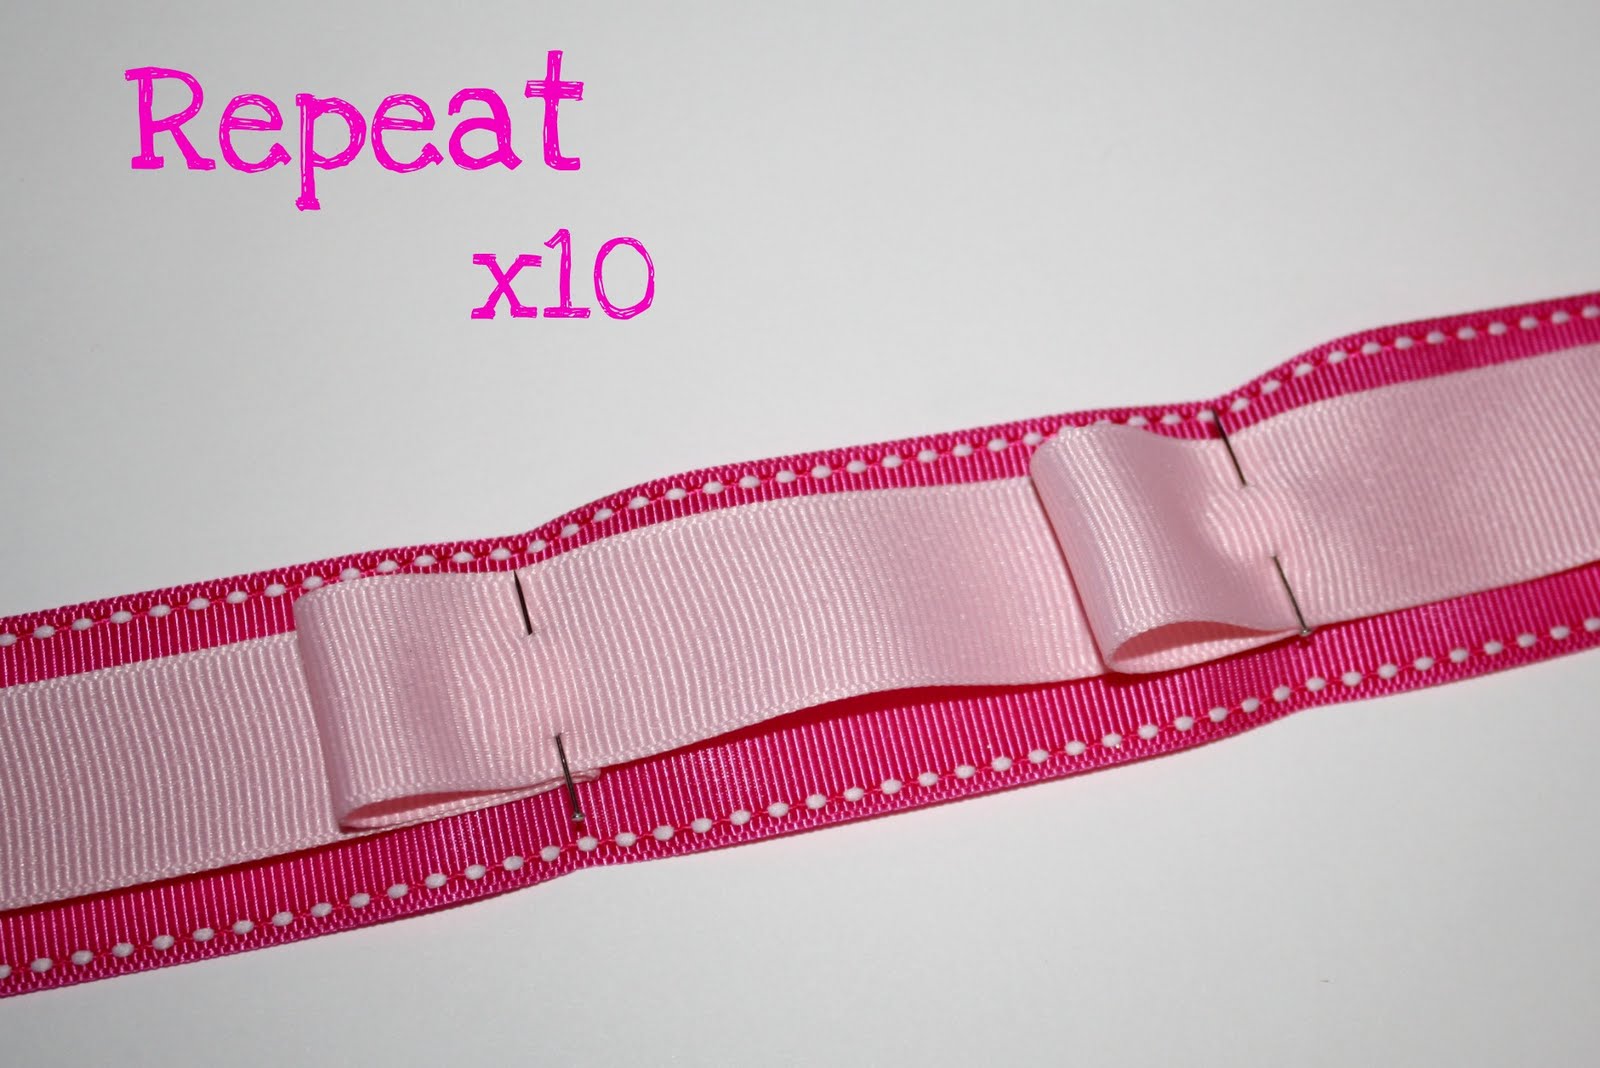
Next, you will measure out 2 inches of the narrow ribbon and fold under until it meets the pin at the 3 inch mark.  Pictures are a little more helpful here than words!
Remove your pin and place it into all layers of ribbon to secure the loop.

Measure 3 inches down from your first pin and repeat the steps you just finished to make 10 loops total.

TIP:  Make sure your narrower ribbon is centered during these steps and it will cause less headaches and fidgeting when you are sewing.

Now you are ready for the sewing maching...mine's name is Lucy...because I Love Lucy!
Fold the top edge down 1/4 of an inch and sew a straight stitch through.
Create a loop with your 3 inch piece of ribbon as if you were making a "cause" or "awareness" ribbon and sew onto the top.

Essentially, the next steps you will just be making long rectangles with your sewing machine.  Start at the top corner and sew until you meet the loop folds.  Sew one or two stitches into the folds to make sure they don't come undone.  Then sew across the top of the loop.

Turn your project so you complete the rectangle.

For the next rectangle start under the loop as close to the edge as possible and repeat the steps you just completed until you reach the end of your ribbon.

Finish by folding up another 1/4 inch and sew in place.  Now admire your 20-30 minutes of hard work...and if you are like me, move on to another project before the kiddos wake up!


There you go!  Have a good week there are lots of other SITS stuff in the works!

Linked up to these FAB-U-LOUS blogs this week! <3

Strut Your Stuff @ Today's Creative Blog
Sugar and Spice @ 733 Blog
Inspiring Creativity @ Dragonfly Designs
We Did it Wednesday @ Sew Much Ado
Show and Tell @ Blue Cricket Design


Friday, May 20, 2011

A Bubble Dress That Didn't Bubble

It was still super cute on my Little Lotte, but my poor bubble dress didn't bubble.  We wore this at a wedding rehearsal and she was by far the cutest little girl there...it doesn't hurt that she was the only little girl there!

I had a hard time making her sit still long enough to get a good picture.  So here are a slew of mediocre pictures that you can piece together to get the idea of how cute it is.

Here it is hiked up to her diaper due to the swing, but she is HAPPY!

You can see a close up of the rosettes here, and a cute little face.

This might be the best view I got of the whole outfit.
Notice the matching headband...it might be my favorite part!

Never a dull moment with a full fledged toddler!

In case you don't remember when I showed you the bubble dress from Me Sew Crazy, here it is again.


I followed her tutorial but my bubble didn't bubble.  Can anyone tell me why it just looks like a regular skirt?  I want to make a dress for Lotte's birthday party that bubbles, but I need to find out how to do it right.  Is it the fabric that makes a difference?

Monday, April 25, 2011

Easter Recap

We had such a wonderful weekend!  I loved all the family time and I loved celebrating Lotte's first Easter as a big girl walking!

On Friday we bought our new table and chairs/bench!  After we set it all up in the dining room we died eggs.  We used the box the table came in on the floor.  I figured it would be a messy experience. 

On Saturday we had my family over for deserts.  I made cookies earlier in the week and each of the women in our family brought a pie or cake.  Here was my springy set up.


I used the free printable from The Pink Ink Doodle in my blue frame, and I basically copied Sweet Sugar Belle for my cookies.  They turned out better than I expected, but if you look at her amazing work you will never be 100% pleased with yours.  This picture doesn't show all my mini cookies, but there were 70 minis and 3.5 dozen regular cookies.  I had a blast decorating them.  My family really enjoyed eating them!

That's my mom admiring them in the background!

On Sunday morning we got up early to have breakfast, hunt eggs and get ready for church.

Little girl's breakfast...Bunny shaped toast, her name Easter egg, plain yogurt with her special holiday topping (bunny pastel marshmallows).  The most fun was the pink milk with a silly straw! 

Here she is hunting eggs in the living room because it has been raining for a week!

The Easter Bunny hid their baskets in the bathroom!  Silly Bunny! 

Last year I convinced my husband to allow me to order Lotte a Pottery Barn basket.  But it was too late and they were out of the ones that I wanted.  So I found this basket at Michael's for $13.00.  A friend at work has an embroidery machine and was nice enough to put her name on it for me.

I found a matching basket this year for Brother!  It was 50% off when I bought it.

Things were a little different this year and we couldn't have Easter Dinner at my aunt's house like normal so we had brunch up at the country club.

 Lotte and one of her favorite cousins.
 LOVE this picture
 Here is a picture of her full dress.  So perfect.
And just so you know...Brother was there too!

After brunch we spent time with my husband's family and we came home much earlier than normal.  We just hung out the four of us all evening.  It was a perfect weekend.  I hope everyone's was as nice as ours!

Saturday, April 16, 2011

Lotte's Ruffle Chickie Shirt

So there is still a week until Easter and if you are like me then you still have 100 things to do or that you want to do.  Here is one thing checked off my list!

A local photographer offered a mini-session at her studio for spring.  It was a GREAT deal...and the background was a cute little wooden dock with a duck pond and BABY DUCKIES!!! So I had to have a cute outfit for Lotte to wear.

I had to go with the chick/duckie theme...so here is what I came up with!


Amy at Positively Splendid made THIS adorable egg shirt!  Lately I've been obsessed with ruffles and so I decided on a variation of this for our photo shoot!


Amy's tutorial is very well done and I'm going to ship you over there if you need to learn how to make and assemble the ruffles.  I did make my ruffles a little "rufflier", so my stripes were a little longer.

Here are my ruffles.  I alternated solid yellow with a patterned yellow.
I used my biggest egg shaped cookie cutter as a stencil.
I didn't have any interfacing on hand, so I sewed my ruffles onto felt.
I just did a lot of pinning to make sure there wasn't any movement.

I used orange ric rac for legs.  They were pinned under the ruffles before I started sewing.
I left them dangly, but you could hot glue the on.
Finally, I sewed on some button eyes and a felt beak.

Here is the finished product coupled with a cute yellow tutu!

I love this girl!

And everyone loves a tutu bottom!

Here is one last look at the close up!  It was fabulous for pictures...the photographer loved it, and so did the duckies!  Thanks Amy for the inspiration!


These AWESOME blogs are hosting parties with this little cutie this week! Thanks ladies!

Sunday, April 10, 2011

Ruffles and Rainbows

Have you ever made something so pretty that it was really hard to give it away?  Well, yesterday I made the cutest and most amazing baby gift ever.  I almost cried having to part with it.  But I really do love giving presents, and I know my friend will love and appreciate them as much as I would have!

Here it is my RUFFLES AND RAINBOWS burp cloth set!


The Rainbow


My husband said, "But aren't babies supposed to spit up on these?  Then why are they pretty and have ruffles?"  I rolled my eyes.  Yes they are ruffly and gorgeous, but you can have a pretty accessory resting on your shoulder while getting spit up on!


The PINK and ORANGE


Yellow and Green were combined.


LOVE the Blue!


Pretty Purple damask with ric rac.


Hair clip rosettes to match.


Packaged and ready for Little Miss Coles (Brother's girlfriend) to use upon her arrival!

I had a lot of fun decorating these burp clothes.  In fact I'm making a second set with all the left over fabric.  Which brings me to my weekend's great debate!  To Etsy or not to Etsy?!?  I really want to start, but I'm afraid to make the jump.  I am interested in selling personalized fabric party banners, party decorations, and the occasional perfect party gift!  Once I get my but in gear and put my daughter's birthday post up you will see my real passion!

Any Etsy advice?


Related Posts Plugin for WordPress, Blogger...