Showing posts with label Tutorial. Show all posts

Tuesday, February 28, 2012

Little Boy Suspenders


There are a few tutorials on the web that are for little man suspenders.

HERE is one that uses "Fashion Fit" clips that I couldn't find in my local stores.

HERE is another tutorial that uses dyed elastic, but that was a little too expensive for me.

I like the first tutorial, but I couldn't find affordable clips and mine needed to be all fabric.  I grabbed some houndstooth that matches Brother's party stuff, a pair of thrifted suspenders and got to work.

(forgive the black and white pictures, but you really don't want to see my ironing board cover...blech)

For Brother (one year old) I made my fabric strips 24 inches long.  For a toddler, I would go with 27; infant 21...if in doubt, measure baby and add 4-5 inches.  Your width will depend on how wide your suspender clips are.  My clip was a little less than and inch and a half.

Sew Right Sides Together to form a long tube.  Turn tube of fabric right side out.

Press so the hem is in the middle...this will be the back of your suspender.
I used a thrifted pair of suspenders and cut the metal attachments off of the elastic.
Here is where it gets a bit complicated, and I hope that my pictures can explain it better.  If not, take pictures of your intact suspenders to use as reference for how they go back together.

The part that lengthens the suspender is call the "SLIDE".  (I didn't make that up)  You will use a roll hem and sew the FRONT of the FABRIC with the BACK side of the SLIDE facing you.

Pull the suspender "CLIP" onto the strip of fabric with the clip facing the right side of fabric.

Pull the free end of the fabric through the slide.  Now it looks like suspenders!

The second clip goes on the open end of the fabric.  Sew it on just as you did the slide.  Using a roll hem so you don't see the ratty end of the fabric.

REPEAT, because you need two straps silly!

Measure your child from front waist band to the back waist band, making sure you cross it in the back.
After you have that measurement, make sure both of your straps are even.

I tried them on Brother and found where they crossed well in the back.  You could guess, but make sure the back clips are several inches apart, or they won't lay flat.

Sew a diamond shape where the straps overlap.  You don't have to do a diamond either...the next time I'm thinking of doing straight lines all the way across or just doing a big "X".  I will also be using iron on interfacing for the next pair.  These worked great for what I was wanting, but I think they would be better with a little more umph!


The suspenders where a HUGE hit for Brother's Birthday Pictures and Party!  Everyone loved them and couldn't believe that I made them myself.  I really love that they match his birthday party colors perfectly.  But you will have to wait to see all that until after the GRAND PARTY reveal!

Linking up to these lovely and gracious hostesses!

We Did It Wednesday--Sew Much Ado
Inspiring Creativity--Dragonfly Designs
Show and Tell--Blue Cricket Design
DIY Under $5--A Little Tipsy
Get Your Brag On--Gluesticks
A fun new to me link party Trendy Tots--A Real Life Housewife
What Are Little Boys Made Of--733blog
Sundae Scoop--I Heart Naptime
Saturday Seven Party--Positively Splendid
Get Your Craft On--Today's Creative Blog
Craft and Tell--Cherished Bliss

Tuesday, November 29, 2011

Lotte's Advent Calendar

I did a guest post over at GLUESTICKS on Friday.  I was going to wait awhile to post this here, but it is dated material, if you will.  I told you about it in my thankful post, but if you didn't take the jump and see it, here it is....


Lotte is 2 and a half and it is the first Christmas she is able to understand the magic of it all.  So I wanted to give her a calendar of her own to help countdown until the big day!


This cute little guy is in her room above her bookcase.


I didn't want it to be too expensive or too heavy to hang so I made it out of Balsa board.  It is only $3.00 from the craft store, and it can be found in the modeling section.


I used Martha Stewart glitter paint (AMAZING STUFF) on clothespins that I already had in my stash.  Everything is hot-glued together in a sort of random fashion.  The circles where cut from my Cricut and I hand drew the numbers on.

I couldn't find the "perfect ornaments" so I picked up a bag of vase filler from the craft store ($4.99 with a 40% off coupon!).  I made them into ornaments with a straight pin, some glue and ribbon.  If you have ornaments around those would work too, or making them out of felt would add a great touch.

Every day in December she will wake up and put a new ornament on her mini Christmas tree.


This advent calendar is something we will have for years to come and I can't wait for the many Christmases filled with wonder and excitement!


Linking my advent calendar up to these jolly good hostesses!
Strut Your Stuff @ Somewhat Simple
DIY Under $5 @ A Little Tipsy
12 Days of Christmas @ Keeping the Christmas Spirit Alive, 365

Sunday, November 13, 2011

Making life simple! Cutting tulle the FAST way!

So I recently have made two tutus!  One for an order and one for Lotte's Halloween costume.


For the Halloween costume, I bought tulle off of the bolt.  It is so much cheaper, and for Lotte, it's okay if it isn't perfectly cut.  I went to youtube and searched "cutting tulle from bolt"  there was a super great video tutorial HERE and I LOVE this lady because she saved me a BUNCH of time and effort.

I made the lady bug tutu before and didn't think about youtube-ing of googling the fast way to cut tulle from the spool.  So I think I'm pretty GENIUS for coming up with this.

I wanted an 8 inch tutu for a one year old.  So I cut a piece of cardboard 16 inches long {doubled}.  I made sure that it was wider than 6 inches.

I started the tulle at the very top of the cardboard and just simply flipped it around and around and around until the entire spool was wrapped around the cardboard.


I then took scissors and cut through all the layers of tulle at both the top and the bottom of the board.


I removed the board and had a beautiful and neat stack of tulle the exact length that I needed it for my tutu.


This made it super easy to keep the tulle really straight and "fresh".  I didn't want to send it out all rumply and crumply.


I hope this helps you shave time and hassle off of your tutu endeavors!

I'm linking up to these awesome hostesses this week!  Thank you ladies!!
Show and Tell @ Blue Cricket Design

Monday, June 6, 2011

Headband holder

A while ago,  Courtier Mommy posted my headband holder tutorial.  Since then she has had her TWINS!  {What did you do last week! Ha} Now I'm going to share the tutorial on my blog!  Here is part of the post from her blog.......

Lately Lotte and I have been wearing a lot of headbands with fabric and ribbon rosettes.  We have a LOT!  Have you noticed that headbands are extremely difficult to store.  I found myself putting them all in a gallon sized ziplock bag and shoving them into the bathroom closet.  ~not cool~ But a headbands don't clip, so I had to make a ribbon holder with loops


........and here is how I did it.


You will need:
34 inches of wide (1 1/2 inch) ribbon
54 inches of narrower (7/8 inch) ribbon {I left mine on the spool to make sure that I had enough}
3 inches of narrow (3/4 inch) ribbon
Straight Pins
Sewing Gauge
Sewing machine and tools

{all measurements are for my 33 1/2 inch long holder with 10 loops that are the perfect size for skinny headbands.  You could just as easily make yours with more loops, less loops or even bigger loops for bigger headbands}

Start out with your wide ribbon and heat seal the ends by running them near a candle flame.
Place your narrower ribbon centered on the wide ribbon and pin them together near the top edge.
Measure 3 inches from top and add a pin to mark your place.

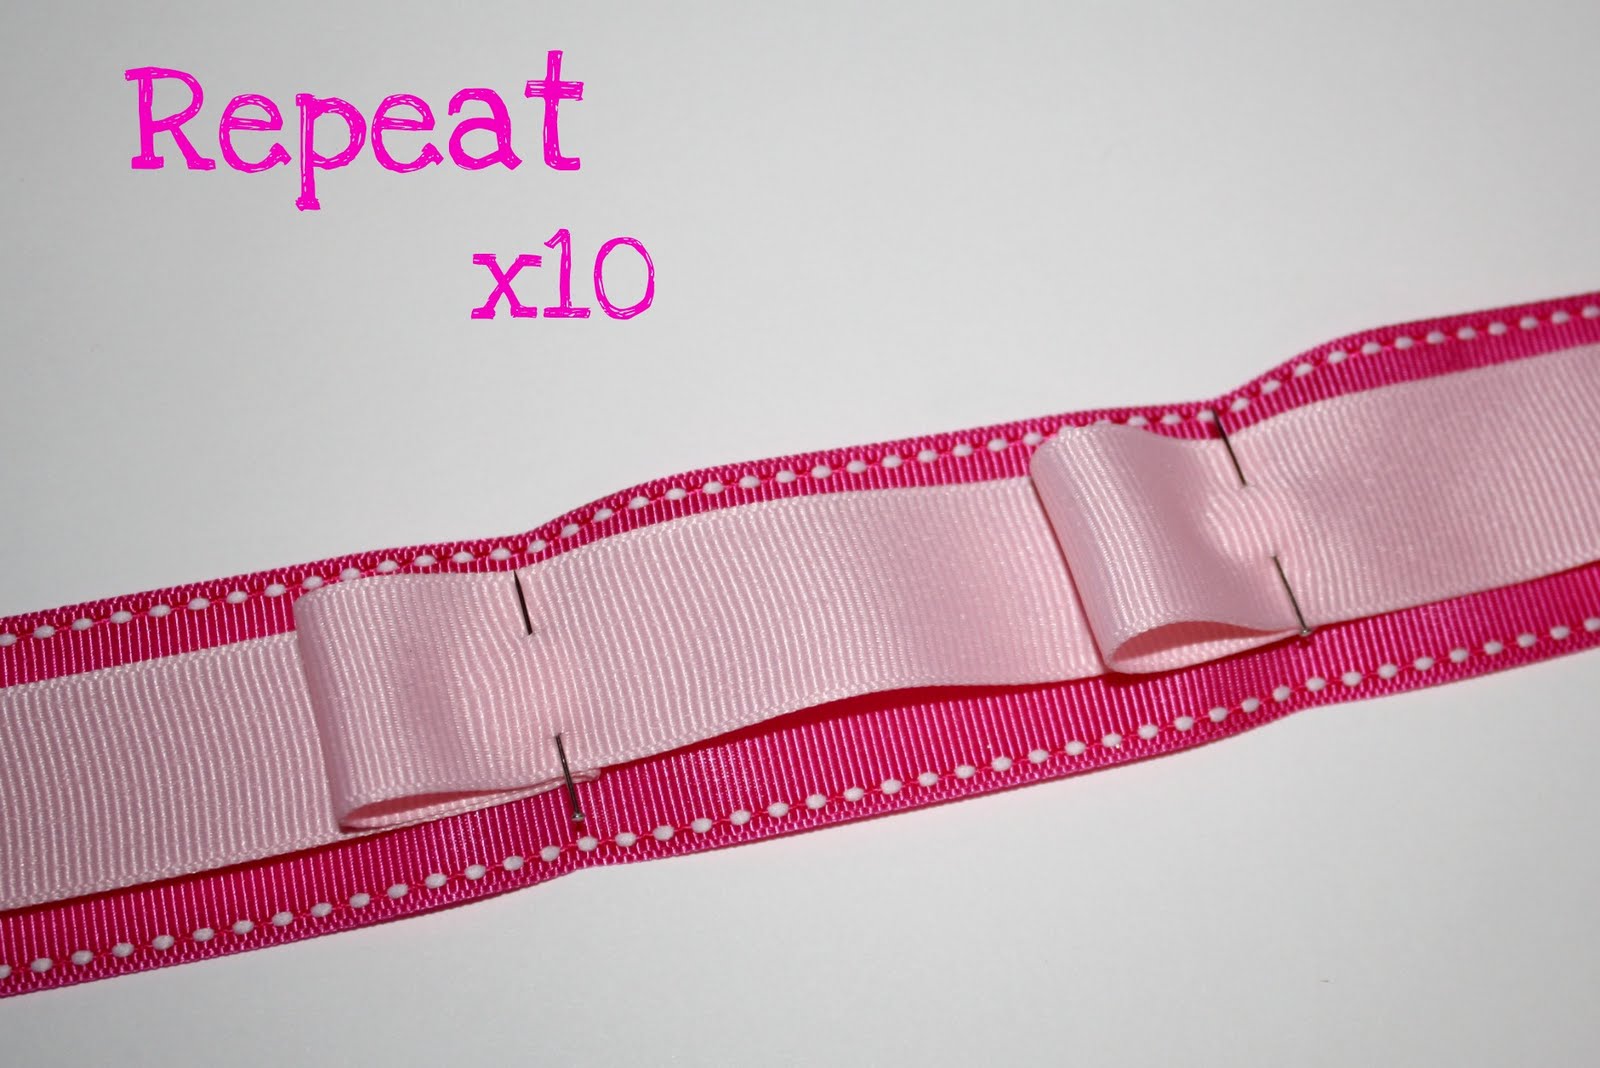
Next, you will measure out 2 inches of the narrow ribbon and fold under until it meets the pin at the 3 inch mark.  Pictures are a little more helpful here than words!
Remove your pin and place it into all layers of ribbon to secure the loop.

Measure 3 inches down from your first pin and repeat the steps you just finished to make 10 loops total.

TIP:  Make sure your narrower ribbon is centered during these steps and it will cause less headaches and fidgeting when you are sewing.

Now you are ready for the sewing maching...mine's name is Lucy...because I Love Lucy!
Fold the top edge down 1/4 of an inch and sew a straight stitch through.
Create a loop with your 3 inch piece of ribbon as if you were making a "cause" or "awareness" ribbon and sew onto the top.

Essentially, the next steps you will just be making long rectangles with your sewing machine.  Start at the top corner and sew until you meet the loop folds.  Sew one or two stitches into the folds to make sure they don't come undone.  Then sew across the top of the loop.

Turn your project so you complete the rectangle.

For the next rectangle start under the loop as close to the edge as possible and repeat the steps you just completed until you reach the end of your ribbon.

Finish by folding up another 1/4 inch and sew in place.  Now admire your 20-30 minutes of hard work...and if you are like me, move on to another project before the kiddos wake up!


There you go!  Have a good week there are lots of other SITS stuff in the works!

Linked up to these FAB-U-LOUS blogs this week! <3

Strut Your Stuff @ Today's Creative Blog
Sugar and Spice @ 733 Blog
Inspiring Creativity @ Dragonfly Designs
We Did it Wednesday @ Sew Much Ado
Show and Tell @ Blue Cricket Design


Related Posts Plugin for WordPress, Blogger...